Have you ever noticed that anything that can go wrong… will go wrong?
Well, it's not just coincidence...
It's it’s a powerful adage called Murphy’s Law, and it seems to be even more powerful during high-stress, emergency, or survival situations.
It’s the way the world works, and it’s why I so strongly believe developing your survival skills is just as important as having the proper survival gear.
One simple piece of survival gear everyone should have in their go bag, bug out bag, and emergency car survival kit is an emergency sleeping bag, also known as a survival bivy.
This lightweight piece of gear can keep you alive in the harshest conditions and packs up into a tiny stuff sack so it’s easy to take with you nearly anywhere.
And the best emergency sleeping bags are made using thick durable material that’s puncture resistant and capable of standing up to multiple uses.
But... the ultra-lightweight, compact design won't stand up to an errant knife or other accidental tear or puncture... even the most durable bivy, so you have to be prepared to fix a rip or tear in your bivy if one occurs in the field.
You can’t let something so simple be your downfall in an emergency.
And as Murphy’s Law states, this will go wrong at some point… and it will likely be at a bad time.
Luckily, one of the best benefits of an emergency sleeping bag is that in addition to keeping you warm in an emergency, it’s also a breeze to fix a tear with one of several pieces of gear you should already have in your bug out bag.
And that’s exactly what I’m going to show you here.
In this post, I will show you 2 ways to fix a torn emergency bivy or sleeping bag using gear you already have in your bug out bag.
Oh, and if it’s your emergency blanket that gets torn, these three techniques work just as well.
Let’s jump in.
Duct Tape should be a staple in your bug out bag because it has such a wide variety of uses as an improvisation tool to for gear repair, first aid, and much more.
But if you don’t have duct tape in a crisis, try and get your hands on another type of tape whether it’s the athletic tape from your first aid kit, Gorilla Tape, or packing tape from a garage or spare box in a crisis.
Many kinds of tape will work, go with the best option you have.
Once you’ve got your tape, you’re just a few seconds away from patching your emergency sleeping bag.
To start, grab your roll of duct tape and your knife or pair of scissors.

Next, lay your emergency sleeping bag out flat on a flat surface so you can easily work.
Pull a strip of duct tape from the roll that is long enough to cover up the tear in your bivy and extends beyond the tear approximately 1 inch on each end and set aside.

Using the first piece of duct tape as your guide, cut a second piece of tape from your roll that’s approximately the same length and set aside.
Now that you have your two pieces of tape to repair the rip, start by patching the outside first.
Use your flat surface to lay out the tear out as flat as possible and secure the edges of the tear together. If you have a friend nearby that can help with this stage, ask for a spare set of hands.

Once you have your tear completely flat and the edges secured together, apply your piece of tape over the tear and press firmly to secure it in place.

Now that you have the hole patched on the outside, I like to double the strength by repeating the process on the inside of the bivy.
Start by turning your emergency bivy shiny side out and lying it back on your flat surface, again laid out completely flat.

Next, just like you did on the outside, apply your second piece of tape over the back side of the tear.

This piece should be applied directly parallel to your first piece of tape creating the feel of a single strip over the tear.

And that’s it, the tear in your bivy should be securely patched so you can climb back in without worrying about the hole expanding.
Like Duct Tape, “super glue” has tons of uses during a survival situation.
So whether it’s Krazy Glue, Gorilla Glue, or the original Super Glue, you should have some type of super-sticky glue in your survival gear for times like this when you need to repair a piece of gear in the field.
To properly fix your bivy using this technique, you need to use more precision than Method #1 because it’s easy to apply too much glue or for the glue to leak through to the wrong side of your emergency sleeping bag.
So find a way to get out of the elements to a calm area and lay your emergency sleeping bag over a flat surface with the tear facing up towards you.

Once you have your emergency sleeping bag laid out on a flat surface to work, it’s time to grab your glue and get the rip patched.
Like I’ve already mentioned, precision is critical with this technique, both in terms of where you apply the glue but also how much you use.
Remember, a little goes a long way with modern super glues.
If it’s available to you, grab a smooth stick, piece of paper, or stone you can use as a glue applicator... it makes applying the glue properly much easier.
If you have an extra piece of paper, piece of smooth wood, smooth rock, or something else you can lay on inside of your sleeping bag on the bottom side of the tear while you’re applying glue, it will help ensure an extra level of protection to keep from gluing the two sides of your bag together.
If you don’t have one, it’s no biggie, just be extra careful.
Next, apply a bit of super glue onto your applicator and then carefully apply a very thin layer to one of the torn edges.

You don’t want any extra bubbles or build up on the edge, just a small, thin, smooth layer of glue.

Once your glue is in place, take the opposite edge of the tear and press it smoothly over the glue from the center of the tear outwards.

Be sure you’re not pressing the glue through to the other side of the sleeping bag or you’ll end up with another problem to solve…
Once you’ve applied the glue and secured the torn edges together, reach into your emergency sleeping bag to hold the bottom side of the tear away from the opposite sleeping bag wall.
This will ensure the two walls of your bivy don’t end up glued together…
You can softly blow on the tear to help the glue dry more quickly, but even without the added ventilation, the glue will be dry in 60 seconds or less.

Once the glue has dried, you’re all set to climb inside your emergency sleeping bag or roll it up and store it away for the next time you need it.
Just as Murphy’s Law reminds us, if you ever need to rely on your emergency sleeping bag, at some point you’ll likely get a puncture or tear that needs patching…
And the way the world works, it’s likely it will be at a not-so-convenient time…
But that’s why I created this post, so you would have two different strategies to fix a rip or tear in your emergency bivy using gear you should already have in your emergency supplies.
If you have fallen victim to an emergency sleeping bag tear, once you’ve made it back home, I recommend picking up a new one to eliminate any risk of using a compromised piece of gear.
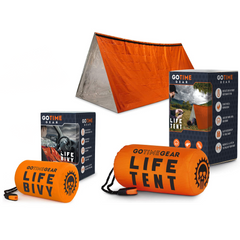
At Go Time Gear™, we have engineered the Life Bivy to be a complete survival system combining not only be the highest quality, most durable, re-usable, emergency sleeping bag available today…
But it comes rolled up inside of a durable nylon drawstring bag that synchs shut using a 7-strand paracord drawstring with an ear-splitting 120-decibel survival whistle attached to the end.
This is a complete survival system you can count on to keep you alive when you need it.
And designed to be ultra-durable to stand up to the most intense survival situations, the extra thick walls with puncture resistant coating help ensure you won’t need to utilize the repair techniques I’ve just shown you on your own bivy in the future.
If you have any questions about the methods I’ve just shared with you to fix a tear in your emergency bivy or have another method you like to use, I’d love to hear about it in the comments.
Go Time Gear® stands behind everything we sell. We want to be a part of preparing you and your family which means ensuring you have confidence in every product you’re counting on when you need it. If anything in your purchase fails to meet your expectations, you can return it for a replacement or refund within 30 days. We’re confident you will love the products from Go Time Gear® and we’re willing to back it up. To process a refund, visit our support page.
Go Time Gear® uses the latest security standards and encryption technology to ensure we maintain your trust and safety when we are responsible for any of your personal information. In fact, our encryption standards are the same level that large banks use to keep your information secure. From annual on-site assessments ensuring the proper infrastructure is in place, risk management analyses and procedures, cutting edge network security, and card holder data protections in place, everything is routinely monitored and tested to ensure you have a safe and secure shopping experience.
Forget about dealing with complicated shipping policies, minimum orders, or excluded products. When you shop with Go Time Gear®, you get free U.S. standard shipping on your entire order. Every time.
No minimums. No hassles. Just free shipping.