I’m sure you’ve seen the stories in the news...
Power outages.
They happen every year.
Maybe you’ve even been through one.
Seemingly harmless on the surface.
But pull back the veneer, and every year millions of Americans are thrust into a serious survival situation testing their survival supplies and preparedness skills.
Grid outages have been steadily on the rise and recent power outages have affected millions of people in as many as 30% of states simultaneously.
In fact, the U.S. has more blackouts than any other developed nation, and it’s only getting worse…
The U.S. electric grid loses power 285% more frequently than in 1984.
And the dirty little secret… your home isn’t on the top of the list to have its power restored during an outage.
Repairs must first address the power supplies serving hospitals, water treatment facilities, fire and police stations, and many other medical, government, and administrative buildings.
During Hurricane Sandy, this left 8.2 million Americans without power across 17 states, many for 2 weeks.
In 2011, one large snowstorm left more than 3 million Americans without power for as long as 10 days.
Unfortunately these aren’t uncommon occurrences… there are new cases every year.
Fortunately, when you need a field expedient way during an outage to create light, provide heat, and even perform improvised cooking, you can convert many common household items into diy emergency candles.
Pay close attention, in this article I’ll show you 5 different ways you can create an improvised homemade candle.
You’ll learn exactly what steps to take so you’re ready if you need to create light, heat, or even a quick cooking setup.
Let’s begin…
If you know me at all, you know I love converting seemingly “useless” items around the house into field expedient survival solutions.
You can see what I mean with my fire starting hacks using a battery.
Lying around nearly every house, particularly if you have children, are regular old Crayons.
Kids love them. They’re horrible for trying to write out your shopping list. But they are a fantastic option as a self-contained emergency candle.
Step #1: Gather your Crayon and a lighter
Scour the drawers, your children’s school bags, or a jar filled with miscellaneous pens and pencils. Even if you can only find an old crayon that will do, just make sure it still has the paper wrapper around it.
You will also need a lighter or another flame source that can hold a flame for the 10-15 seconds it takes to light your crayon.
My EDC Zippo Lighters always do the trick for me.

Step #2: Prepare Crayon and surface
Being tall and skinny, Crayons easily tip over when standing on their end.
To prevent this, use your lighter to melt the bottom of the Crayon and then stick it onto the surface you’re planning to let your candle burn.

When candle making, be sure to use a flame-resistant surface such as glass or metal. I’ve found, an old aluminum can lid, glass jar, glass plates, or an Altoid tin to be great options.

Step #3: Light the Crayon
Now that the Crayon is standing upright and stable, you’re ready to light your candle.
Light the top of the candle until the wax begins to melt and the paper lights on fire. This can take 10-15 seconds.

The paper serves as the wick and the candle wax burns as the fuel.
Once you have gotten the flame burning, you have 15 to 30 minutes of light from your emergency candle.

Oranges are sold virtually year-round across the U.S. and can almost always be found in most homes or kitchens.
When peeled properly, just add fuel and you have my favorite field expedient survival candle.
Step #1: Gather an orange, cooking oil, knife, and lighter
If you don’t have an orange lying around the kitchen during a survival situation, you will likely be able to find one at a store, from a neighbor, school, or even on a tree if you live in the right climate.
Unlike the Crayon candle, you’re going to need to add fuel to get this DIY candle to burn.
Fortunately, you can use common oils found in most kitchens. Look through your pantry and locate a cooking oil such as olive oil, canola oil, vegetable oil, shortening, or virtually any other type of cooking oil.
In my experience, olive oil worked best.
Lastly, find a knife you can use to cut through the peel of the orange - practically any knife will do.

Step #2: Peel orange into self-contained candle + wick
After you have gathered your orange and cooking oil, it’s time to cut your orange and remove the peel for your homemade candle.
First, place your orange on a cutting surface with the ends facing horizontally.
Next, cut all the way around the center of the orange peel just deep enough to cut through the white pith lining the peel.

Once you have cut all the way around the orange, stick your thumb in the slice on one half of the orange between the peel and flesh of the fruit.
Carefully rotate the orange loosening the peel from the flesh.

Once the peel loosens from the flesh on one half of the orange, grab the ends of the orange and slowly twist and pull the loosened peel from the orange.
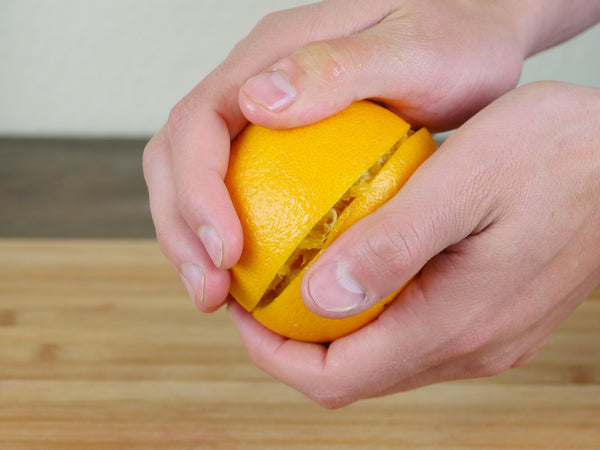
What you’re left with is an orange peel shaped like a small bowl with the central column of the orange intact to serve as your candle wick.

Step #3: Add oil and light
Place your orange candle base on a hard, heat and fire resistant surface.
Slowly pour oil into the orange peel over the top of the central column to soak the wick.

Light the central column of the orange and you have light.

If the candle begins to get near the bottom, simply add more oil to the orange and your candle will continue to burn.

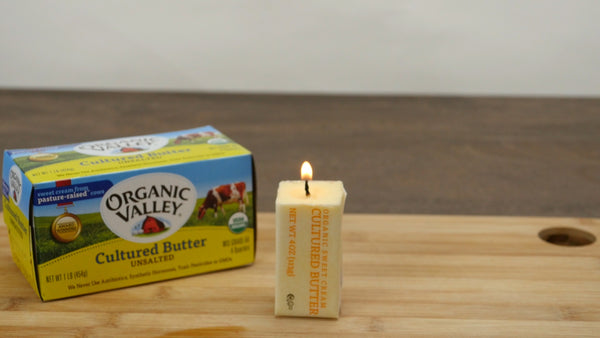
I want to make this clear right away, you should only use this technique during a survival situation if you have met your caloric needs.
Butter is dense and can provide fats and calories which can sustain you in a dire situation.
If you have met your caloric needs and aren’t at risk of running out of food before the end of the survival situation, your stick of butter can serve as a great emergency candle.
Similar to the orange candle, this method only requires one additional item, in combination with the butter to make a candle, a wick.
Step #1: Gather butter and wick
Finding butter is generally no problem.
You'll see it in most kitchens so if you’re out during a survival situation, friends, neighbors, schools, and office kitchens are great places to search.
Next, it’s time to find a wick for your candle.
There are a variety of great options you can use to create a field expedient candle wick.
Newspaper, toilet paper, paper towel, cotton twine, string, even cotton fabric from an old t-shirt are all great options.
Once you have your stick of butter and wick, we’re ready to construct our candle.

Step #2: Put together your candle
Building the butter candle is quick and simple.
First, cut your stick of butter in half. Be sure to keep the paper intact as it helps to keep the structure of your candle longer once it’s burning.
Next, using a toothpick, nail, wire, screwdriver, or any other long straight device, poke a pilot hole into your butter from the exposed end until you reach the opposite end of the butter.

Once you have your pilot hole, wrap a small piece of your wick around the end of your tool and press it down into the butter creating your wick through the entire stick of butter.

After your wick is in place, use a knife or scissors to trim the wick to the proper length for your candle.

Step #3: Light wick
Once your wick is in your candle, you’re just about ready to light your candle.
Before you light your wick, prime the top of the wick by using your finger to rub it around in a circle in the top of the butter.
This will add a small amount of the butter to the wick which makes it light easily and begin burning evenly.
Once you have primed your wick, light your wick using a match or lighter.
Each half of butter will burn for approximately four hours.
Just like the candle made with a stick of butter, making a candle from a can of fish in oil only requires a bit of preparation and adding a wick.
Also like the butter candle, I would only recommend using the oil the fish is in if your caloric needs are totally met.
Oil is calorically dense and can be used to help sustain you when times get tough.
But if you have calories handled, you can use the extra oil from canned fish to create a reliable candle.
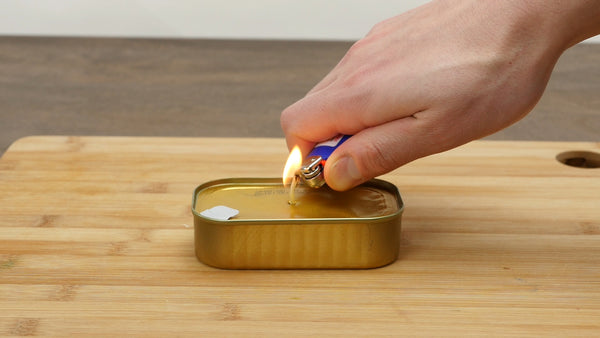
Step #1: Gather materials
To create a candle from a can of fish in oil, you’re going to need your materials to make your candle plus a couple of basic tools.
First, grab a can of fish in oil such as sardines in olive oil.
Other types of fish in oil such as vegetable oil will work, but I’ve found olive oil to make the best candle.
Next you need to get material to use as a wick. For this technique, a piece of cotton string works best.
If you don’t have access to cotton string, you could make a wick from a piece of cotton t-shirt or a similar absorbent material.
Finally, you’re going to need a couple of tools.
Find a nail, small screw driver, thumb tack, other object you can drive through the top of the can to make a hole for your wick.
Next, get a hammer or other blunt object you can use to drive your nail or screw driver through the top of the tin lid.
Now we’re ready to put the candle together.

Step #2: Build candle
First, start by using your hammer and thin sharp object to drive hole into the top of the can.

Next, wrap the wick around the same sharp object you use to create the hole and begin threading the wick into the can.

Thread 3-6 inches of the wick into the can and then trim the wick down to the size you would find on a store bought candle.

Step #3: Light candle
Once you have the wick in the can, let the candle sit for several minutes before you light it.
Letting the wick rest in the oil will give it a chance to absorb into the cotton material so the oil burns once it’s lit. Otherwise, you will end up just burning the cotton.
Once the wick is primed in the oil, it will appear like it’s been soaked in oil.
Now we’re ready to light it.
To prevent unwanted mold growth and retain moisture during the aging process, many cheeses at the super market come packaged with a coating of wax.
Lucky for us, this wax makes fantastic candle fuel.
Like the diy candle made from a stick of butter, all you need is to combine the wax with a field expedient wick and you have a great light or heat source.
Step #1: Find cheese, a knife, and a wick
Whether you have to scour the refrigerator at your house, a neighbors, or the super market, you’re bound to locate cheese coated in wax.
Next, find a cotton string, newspaper, toilet paper, paper towel, or other material to serve as your wick.
Lastly, you will need a knife to cut the wax covering off of the cheese.

Step #2: Cut the wax off the cheese
Once you have your materials, it’s time to remove the wax from the cheese.
The best way I have found to do this is to cut through the wax down to the cheese in the center, and then cut all the way around.

Next, loosen the edge of the wax and it should pull right off.

Lastly, cut the hollow wax shell in half length wise so you have a small piece of wax to work with.

Now we’re ready to construct the candle.
Step #3: Put together candle
Start by laying the wax on a table or other smooth hard surface and flattening the wax.
Next, place your wick on one end of the wax and begin rolling up the wax.

Make sure you use a long enough wick so you have room to light it once you’re finished.
Once you have rolled up the wax, squeeze tightly at the top beneath the wick to secure it.
Lastly, stand the candle up in the direction it will be lit and press it down firmly into the hard surface to create a flat bottom so the candle will stand without a candle holder.

Step #4: Light your candle
Like any of the techniques, place your candle on a material suitable for candles such as a piece of metal or glass, not cardboard or another flammable surface.
Light your candle and you’re left with reliable light built from materials most people just throw in the trash.

Given the frequency, reach, and duration or power outages, it’s just a matter of time until a blackout rolls your way.
Having the ability to quickly create and maintain light and heat using a variety of techniques and materials is a critical survival skill.
That’s why I gave you these five ways to create homemade emergency candles.
By now, you should know which of these techniques best applies to you and your situation.
Take a few minutes to practice the techniques I outlined above.
If any of these methods work well for you, or you have any questions at all, I’d love to hear about it in the comments section below.
Go Time Gear® stands behind everything we sell. We want to be a part of preparing you and your family which means ensuring you have confidence in every product you’re counting on when you need it. If anything in your purchase fails to meet your expectations, you can return it for a replacement or refund within 30 days. We’re confident you will love the products from Go Time Gear® and we’re willing to back it up. To process a refund, visit our support page.
Go Time Gear® uses the latest security standards and encryption technology to ensure we maintain your trust and safety when we are responsible for any of your personal information. In fact, our encryption standards are the same level that large banks use to keep your information secure. From annual on-site assessments ensuring the proper infrastructure is in place, risk management analyses and procedures, cutting edge network security, and card holder data protections in place, everything is routinely monitored and tested to ensure you have a safe and secure shopping experience.
Forget about dealing with complicated shipping policies, minimum orders, or excluded products. When you shop with Go Time Gear®, you get free U.S. standard shipping on your entire order. Every time.
No minimums. No hassles. Just free shipping.